How to make a custom packaging insert for 3D printing from a photo

If you already use your 3D printer not only for figurines and decorative models but also for practical tasks, sooner or later the question of storing, packing and organizing objects comes up. Tools, bits, electronics, components, cosmetics, jewelry, workshop parts — all of this is easier to keep not just in a box, but in a packaging insert with a cutout that matches the shape of the object.
In the past, a task like this usually meant opening a CAD program, manually tracing outlines, setting dimensions, building the model, checking the fit and only then preparing the file for printing. For a single object that is still bearable. But if you need packaging inserts for a whole tool set, a product series or several client orders, manual modeling quickly turns into a long routine.
That is why we are adding another useful tool to AIPRINTGEN monthly plans for users who want to move from idea to a physical result faster. Earlier, the plans gained Riggable for preparing articulated figures and creating joints. Now the workflow gains the Packaging Insert Generator by 3DFabryka — a service that helps you create packaging inserts from a photo and get files for 3D printing, CAD refinement, laser or CNC cutting.
What is a packaging insert
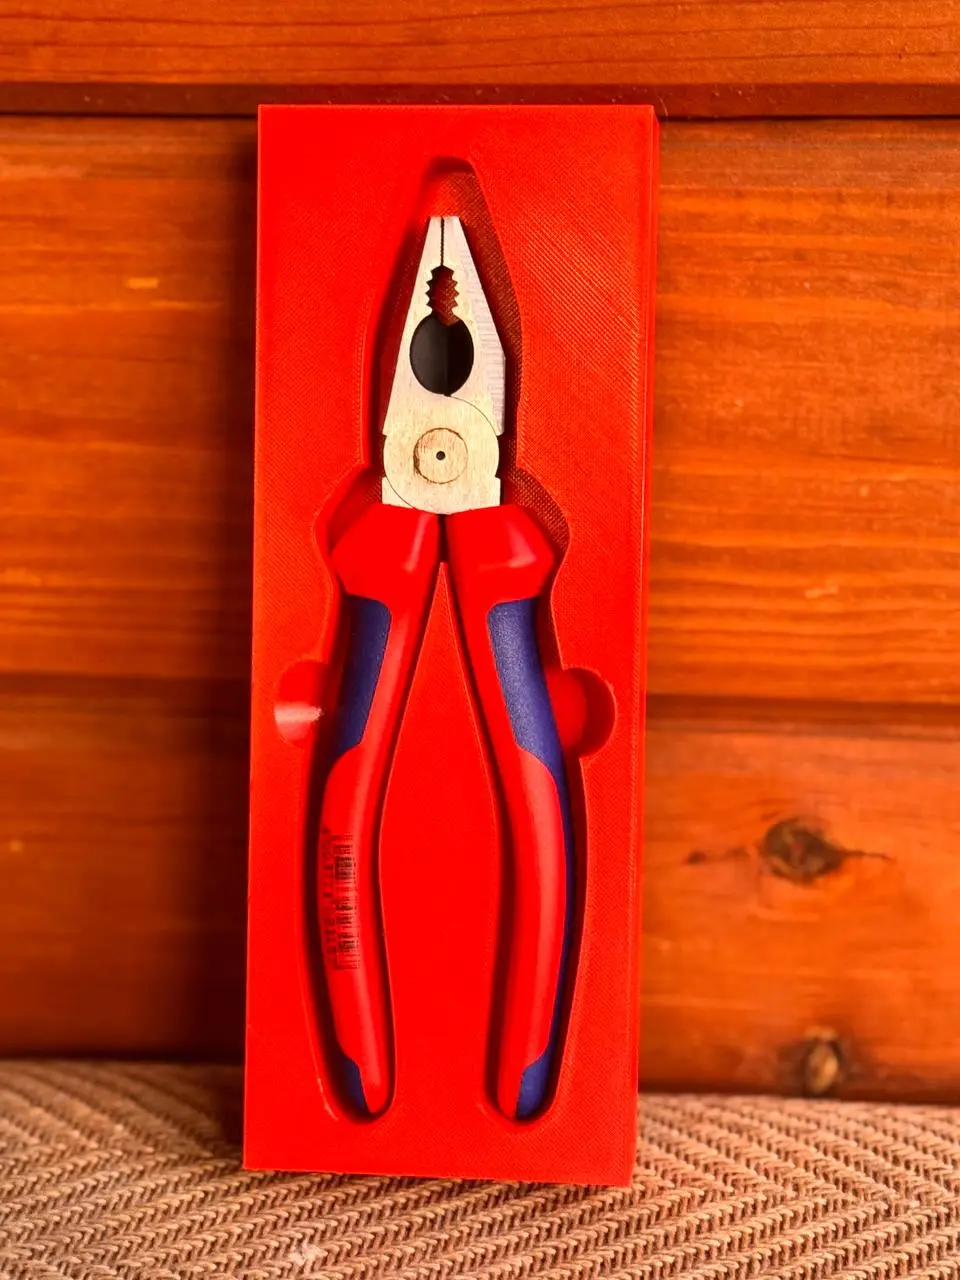
A packaging insert is a liner, pad or shaped form with a cutout matched to a specific object. It is used for storing, transporting, presenting and protecting items. For example, a packaging insert can hold a set of screwdrivers, milling bits, drills, electronic modules, jewelry, cosmetics, souvenirs or assembly parts.
The main job of a packaging insert is to hold the object in place. Thanks to this, things do not get mixed up, scratched or lost, and everything looks neater. For a workshop it helps keep order. For production it speeds up assembly and kitting. For packaging it makes the product look more presentable.
3D printing is a good fit for such tasks because it lets you quickly make a custom liner for a specific shape. You do not need to order a mold or wait for complex manufacturing. It is enough to prepare the model, print it on an FDM printer and check the fit of the object.
What is the 3DFabryka Packaging Insert Generator

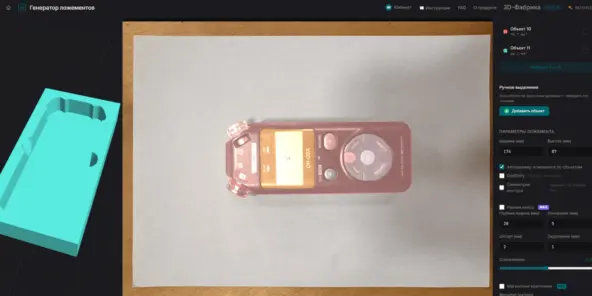
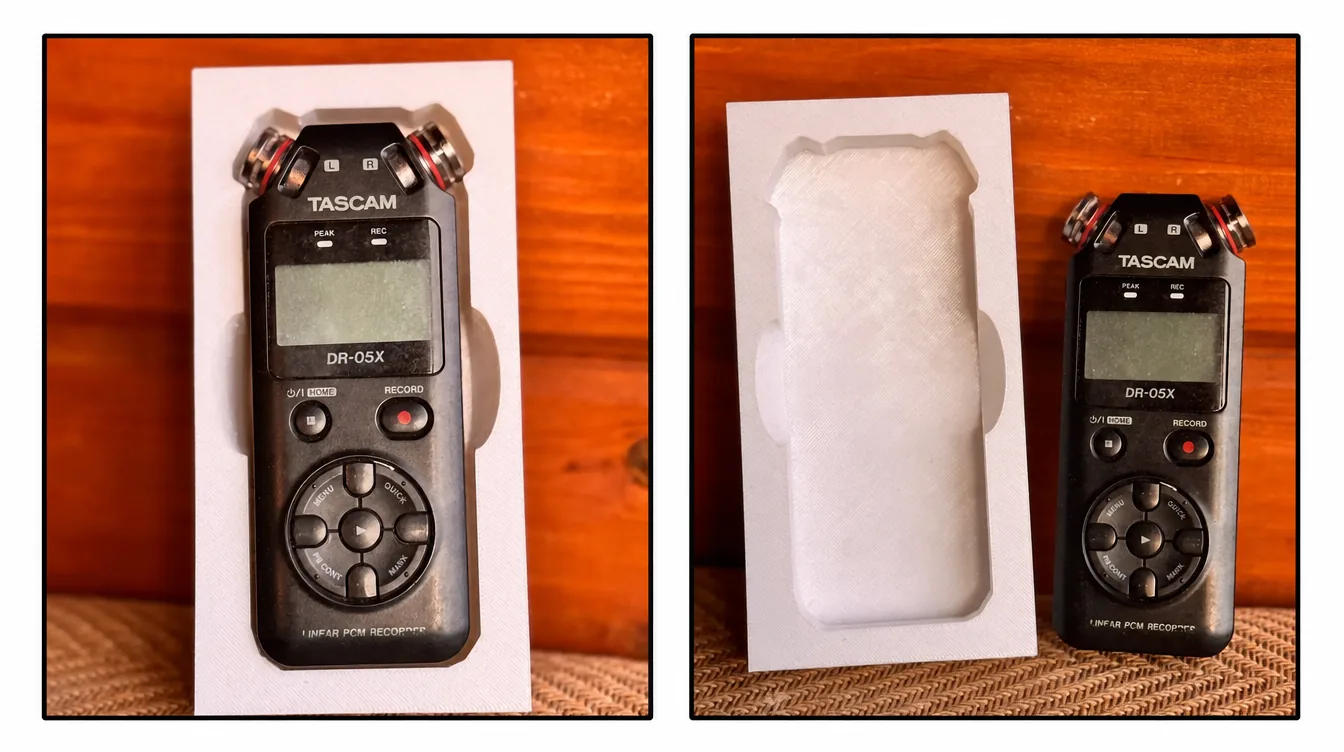
The 3DFabryka Packaging Insert Generator is an online tool for creating 3D models of packaging inserts from a photo. You place an object on an A4 sheet, photograph it from above, upload the image to the service, refine the outline and get a ready packaging insert model.
The service runs in the browser, so it does not require installing a separate CAD program. This is especially handy for those who do 3D printing but do not want to manually model simple, repetitive shapes every time.
The tool uses neural-network segmentation to recognize objects in the photo. After that the service builds the packaging insert geometry and lets you export the result to formats you can use for different production methods: STL and 3MF for 3D printing, STEP for CAD refinement, SVG and DXF for laser or CNC cutting.
What the Packaging Insert Generator is for
The Packaging Insert Generator is useful wherever you need to move quickly from a physical object to a production file. It does not have to be an artistic model — it can be a perfectly practical part: a drawer liner, a tool organizer, product packaging, a protective insert or a case.
With the service you can:
- create a packaging insert shaped for a specific object;
- prepare a liner for storing tools and components;
- make an organizer for a workshop or production area;
- prepare a packaging or presentation insert;
- get STL or 3MF for 3D printing;
- export STEP for further refinement in CAD;
- use SVG or DXF for laser and CNC cutting;
- cut down the time spent on manual modeling.
For AIPRINTGEN users this is a logical extension of the workflow. In one scenario a person can create 3D models from text, an image or several views. In another — quickly prepare practical items for printing: packaging inserts, liners, cases and organizers.
How creating a packaging insert from a photo works
The workflow is built so that you can use it without complex preparation.
- Place the object on an A4 sheet. The sheet is needed not only as a background but also as a scale reference. The service can use it to calculate the real dimensions of the object in millimeters.
- Take a photo from above. It is best to use even lighting and a contrasting background, and to keep the camera parallel to the surface. The cleaner the source photo, the easier it is for the system to detect the outline correctly.
- Upload the photo to the Packaging Insert Generator. The service recognizes the objects in the image and suggests outlines.
- Refine the selection. If needed, you can choose the right outline, add or exclude areas so the future cutout matches the shape of the object.
- Adjust the model settings. After recognition you can view a 3D preview and check the shape, depth and structure of the packaging insert.
- Export the file. You can save the finished model in the format you need and then open it in a slicer or CAD program, or use it for another production method.
This scenario is especially useful when you need to make not one unique object but a series of similar packaging inserts. For example, for a set of milling bits, screwdrivers, measuring tools, electronic components or items being shipped to a client.
Which export formats are supported
One important advantage of the Packaging Insert Generator is the ability to get files for different production scenarios.
- STL fits most 3D printing tasks. Such a file opens in Cura, PrusaSlicer, Bambu Studio, OrcaSlicer and other popular slicers.
- 3MF is handy for a more modern 3D printing workflow when you need to keep more information about the model and its preparation.
- STEP is needed if you plan to refine the model in a CAD program. For example, you can open the file in Fusion 360, SolidWorks, FreeCAD or another engineering system and make additional changes.
- SVG and DXF are suitable for laser or CNC cutting, when the packaging insert should be made not on a 3D printer but from sheet material or in another way.
Thanks to this, the same tool can be used not only for home FDM printers but also for workshops, small-scale production, service teams and companies that make custom packaging or tooling.
Which capabilities are especially useful
The Packaging Insert Generator is not limited to a simple outline cutout. It has several features that make the tool more useful for real work.
- 3D preview in the browser. You can view the model before exporting and spot obvious mistakes faster.
- Automatic scale detection. If the object lies on an A4 sheet, the service can calculate the real dimensions, which reduces the number of manual measurements.
- Grips (finger cutouts) for removal. You can add cutouts to the packaging insert so the object is easy to pick out with your fingers.
- Case mode. Besides a simple liner, you can prepare a body with a lid, rim and fasteners. This is useful for transport, storage or field tool kits.
- Gridfinity. Support for the modular storage system helps those who already use Gridfinity organization on their desk, in the workshop or in a production area.
- Works in the browser. You do not need to install heavy software and model from scratch every time. This matters especially for users who need a quick result rather than a full engineering project.
Who the Packaging Insert Generator is for
The tool will be useful not only to 3D printer owners but to anyone who regularly works with objects that need to be stored, transported or presented neatly.
The Packaging Insert Generator works best for:
- FDM printer owners;
- 3D studios and print farms;
- workshops and small-scale production;
- tooling areas;
- service and repair teams;
- companies that make packaging;
- sellers and product manufacturers;
- makers who need tidy organizers;
- educational workshops and labs.
For example, the service can be used for a tool set in a drawer, a case with field equipment, a presentation insert for a product, an organizer for components or a protective liner for fragile items. If you do not have your own model yet, you can start with generation or pick a suitable object in the catalog of 3D models for printing.
Which limitations are important to keep in mind
The Packaging Insert Generator speeds up the work but does not remove the need to check the result before production. As with any 3D printing task, the outcome depends on the source data, the photo quality, the model settings and the print parameters.
Before printing it is worth checking:
- whether the scale was detected correctly;
- whether the object outline was recognized correctly;
- whether there is enough clearance for a comfortable fit;
- whether the object will be easy to take out of the packaging insert;
- whether the cutout depth is right;
- whether there are walls that are too thin;
- whether the model fits the build plate of your 3D printer.
It is also important to account for material shrinkage, the accuracy of your specific printer and the characteristics of the plastic. PLA, PETG and other popular materials may require different clearances and print settings. If the packaging insert needs a tight fit or serial use, it is better to print a test version first.
How the Packaging Insert Generator complements AIPRINTGEN
AIPRINTGEN helps you quickly create 3D models from text, an image and other source data. But for 3D printing, what often matters is not only generating the model itself, but the whole path to a physical object.
That is exactly why we are gradually adding extra tools to the monthly plans that cover different stages of creating the final product.
Riggable helps turn a static model into an articulated figure: split it into parts, add joints and prepare the pieces for assembly.
The 3DFabryka Packaging Insert Generator covers a different scenario: quickly creating a practical liner, organizer, case or packaging insert for a specific object. This is especially useful for those who use 3D printing not only for creativity but also for real tasks in a workshop, production, packaging or storage.
Together these tools make AIPRINTGEN monthly plans more versatile. The user gets not just 3D model generation, but access to a set of services that help move from idea to a finished solution faster.
How to get access to the Packaging Insert Generator in AIPRINTGEN
Access to the 3DFabryka Packaging Insert Generator is provided to users of AIPRINTGEN monthly plans. After activating a suitable plan, the user receives instructions on how to activate the service.
This is convenient if you already create models in AIPRINTGEN and want to expand your 3D printing options: making not only figurines, characters and decorative objects, but also practical things for the workshop, business, packaging and storage.
Details are available on the AIPRINTGEN pricing page.
Frequently asked questions
Which objects are suitable for creating a packaging insert?
The best fit are objects you can lay on a flat surface and photograph from above: tools, electronics, cosmetics, jewelry, components, toys, accessories and small items.
Can a packaging insert be printed on a regular FDM printer?
Yes. Packaging inserts can be printed on popular FDM printers if the model fits the build area and the print parameters are set correctly.
Does the Packaging Insert Generator replace a CAD program?
Not entirely. It helps you quickly get a basic packaging insert model and cut down manual work, but complex engineering tasks, non-standard designs and precise industrial tooling may require extra refinement in CAD.
Do I need to check the file before printing?
Yes. Before printing it is worth opening the model in a slicer and checking the dimensions, walls, object fit, cutout depth and material settings.
Summary
The 3DFabryka Packaging Insert Generator helps you quickly move from a photo of an object to a ready 3D model of a packaging insert. It is a useful tool for those who use 3D printing in a workshop, production, packaging, service, or simply want to organize storage neatly.
Paired with AIPRINTGEN, it expands the ways you can work with 3D models. You can create models, prepare articulated figures with Riggable, and now also design packaging inserts, cases and liners from a photo.
Create 3D models in AIPRINTGEN, use the extra tools of the monthly plans, and move from idea to a finished physical object faster.
 Our community