How to create a 3D model from a photo with AI for 3D printing

You can create a 3D model from a photo without building the geometry by hand in Blender or ZBrush. You upload an image, the neural network analyses the silhouette, the proportions and the visible volume of the object, and then produces a polygon model. You can inspect the result from every side, download it in a suitable format and prepare it for 3D printing.
Generation is especially convenient for figurines, animals, mascots, souvenirs and decorative objects. The photograph serves as a visual reference, so the quality of the result depends on how clearly the silhouette, proportions and details read.
In AIPRINTGEN you can inspect the model in the built-in 3D viewer and download it as STL, OBJ, GLB or FBX.
What generating a 3D model from a photo means
Generating a 3D model from a photo, or image-to-3D, is the conversion of a flat image into a volumetric digital object. The neural network assesses the outer contour, the visible volumes, the proportions, the relative placement of details, and the colour and texture of the surface. It then fills in the areas it cannot see and builds a polygon mesh.
The system typically analyses:
- the silhouette and the boundaries of the object;
- the volume and depth of the visible parts;
- the proportions and symmetry;
- the position of limbs, accessories and individual elements;
- the colour and visual texture of the surface;
- the most likely structure of the hidden parts.
The resulting model can be rotated, opened in a 3D editor or loaded into a slicer. AIPRINTGEN supports generation from a single photo and a mode based on four consistent views: front, left, back and right. Several angles reduce the amount of information the system has to reconstruct on its own.

Why AIPRINTGEN is built around 3D printing
What a model needs for a game or a digital visualisation differs from what it needs for physical printing. A game asset cares about textures, rigging and real-time performance. A 3D printer, above all, needs watertight geometry, sufficient thickness in its features, no stray internal surfaces and predictable behaviour once the model is scaled.
In the AIPRINTGEN settings you can choose "3D printing" as the purpose. The service builds a watertight mesh, lets you control the polygon count, create several variants and segment the model into parts.
Why a photo is often more convenient than a text description
Text generation helps when you have an idea but no finished image yet: inventing a fantasy creature, a stylised object or an original character, for instance. A photograph solves a different problem — it shows the neural network straight away exactly what needs to be reproduced.
An image conveys more easily:
- the overall silhouette and proportions;
- the pose and the position of the limbs;
- the shape of clothing and its folds;
- the placement of accessories;
- distinctive facial features;
- the visual style of the future figurine.
You do not have to spell out every detail in words and juggle priorities inside a long prompt. For a personal figurine, a copy of a decorative object or an animal model, a good 2D reference usually gives a clearer starting point.
Generating from a photo is especially convenient when you need to create:
- a character or mascot figurine;
- an animal model;
- a portrait bust;
- a decorative statuette;
- a souvenir or a tabletop-game miniature;
- a base for interior decor;
- a visual copy of an existing object where engineering accuracy is not required.
The limits of generating from a photo
A single photograph reliably shows only the visible side. The back of the head, the back, the reverse side and other hidden elements are filled in by the neural network as a likely continuation of the form, so they may differ from what you expected.
Image-to-3D also does not replace 3D scanning or engineering CAD modelling. If exact dimensions, seats, mating surfaces or tolerances of a fraction of a millimetre matter, the result will need to be measured and reworked by hand.
For greater accuracy, use a three-quarter angle, several consistent views, preprocessing in UltraGen, and a comparison of several variants.
When a bas-relief beats a full 3D model
Not every project needs a model you can look at from every side. For a portrait plaque, a memorial plate, a decorative panel, a raised logo, a stamp or a master model for a mould, it is often easier to create a bas-relief with a flat back straight away.
AIPRINTGEN has a separate bas-relief generator that turns a photo, drawing or logo into a relief 3D model on a flat base. That format removes the main problem of generating from a single angle: the system does not have to invent a full reverse side of the object.
After generation, the service shows several comparable versions; their number and character may change. Compare results from the same source by:
- readability of the large forms and continuity of the silhouette;
- useful detail retained without excessive image noise;
- suitability of the chosen geometry after checking it from the front, side and an oblique angle.

The output is an STL file with a flat base and watertight geometry. A bas-relief can be used for 3D printing, CNC milling, making moulds, souvenirs and interior decor. The flat back usually makes the model easier to place on the build plate; whether supports are needed still depends on the relief geometry and print orientation.
Bas-relief accepts images from 300 pixels on the longer side; for fine detail, use a sharp source of 1000 pixels or more. The main subject should separate clearly from the background, and important lines and details should be large and contrasted enough. Before production, check the scale, the base thickness and the model parameters against your specific printer or machine.
From photo to bas-relief. For CNC, the route is: source photo, drawing or logo → an STL bas-relief on a flat base → geometry checks → stock, tool and toolpath setup in CAM. See "How to Prepare a Bas-Relief STL from a Photo for CNC" for the full workflow.
Which photos work best for creating a 3D model
The clearer the source, the less the neural network has to invent. The photograph does not have to be studio-grade, but the silhouette, the proportions and the important details must read well.
The object is fully in frame
Everything you want to keep should be inside the frame. If the character's legs, the animal's tail or the top of the object are cropped, the system will reconstruct them on its own. For a full-length figurine, use an image from head to shoes. For a bust the upper body is enough, but leave some free space around the shoulders, hair and accessories.

The silhouette separates from the background
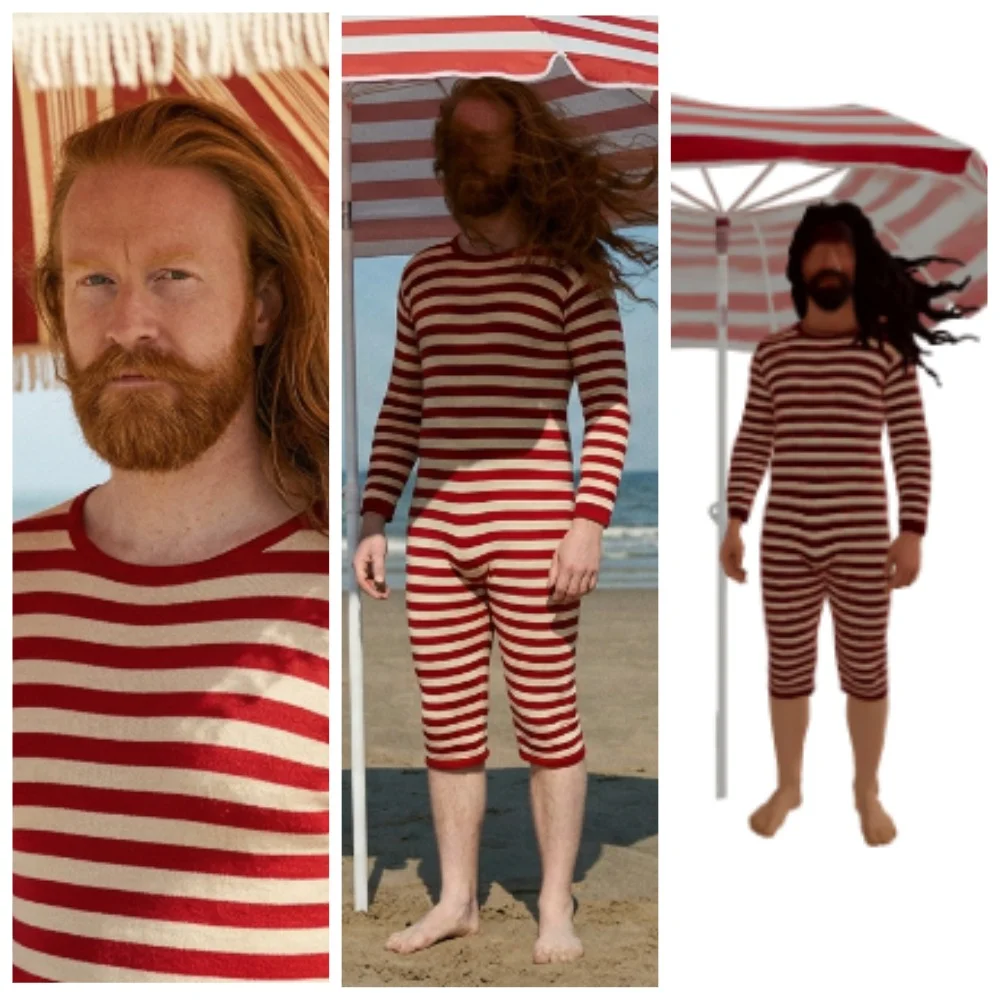
A calm background helps the boundaries of the object be recognised. The fewer stray elements touch the silhouette, the more predictable the shape.
Details do not overlap each other
Arms, legs, hair and accessories should read separately. Limbs pressed against the body and objects held in front of it can merge into the main geometry.
The angle shows the volume
A front view conveys symmetry and proportions well but carries less information about depth. A strict profile can hide half of the important details. A slight three-quarter angle is often the universal choice: it shows the front and the side of the object at once.
The image is sharp enough
Blurred edges, heavy compression and low resolution make small details hard to reconstruct. The standard AIPRINTGEN generation interface recommends images from 300 × 300 to 4000 × 4000 pixels, with a file size preferably up to 4 MB. Enlarging a small blurry picture does not bring lost detail back, so it is better to find a higher-quality source or regenerate it at a higher resolution in the UltraGen tab.
The light does not hide the form
Soft, even light helps the volume read. Deep shadows can hide part of the silhouette, and strong highlights can be taken for geometry. Mirror-like, transparent and very dark objects deserve particular care.
Which images can cause trouble
| Image characteristic | Possible problem | What you can do |
|---|---|---|
| The object is partly obscured | The hidden area will be reconstructed approximately. | Pick another angle or remove the obstructing object. |
| Several characters in frame | The shapes may merge or influence one another. | Leave only the main subject in the frame. |
| Very thin details | Chains, fingers, horns and wires may thicken or disappear. | Enlarge the detail in the reference and check it after scaling. |
| Strong perspective | Near and far parts may end up with distorted proportions. | Shoot from a calmer distance with a less wide angle. |
| Mirror-like surface | Highlights may be read as part of the form. | Reduce the contrast of the highlights or choose more even lighting. |
| Transparent elements | The physical boundaries of the object are determined unreliably. | Replace the transparency with an opaque reference or rework it by hand. |
| Fine ornament or lettering | The detail may stay only in the texture and never appear in the geometry. | Enlarge the pattern; for relief graphics, consider the bas-relief generator. |
| Layered hair and clothing | Individual elements may merge. | Separate the layers visually and use a more readable angle. |
| Very dark image | Boundaries and volume are hard to make out. | Brighten the source without losing texture and silhouette. |
How to prepare an image before creating a 3D model
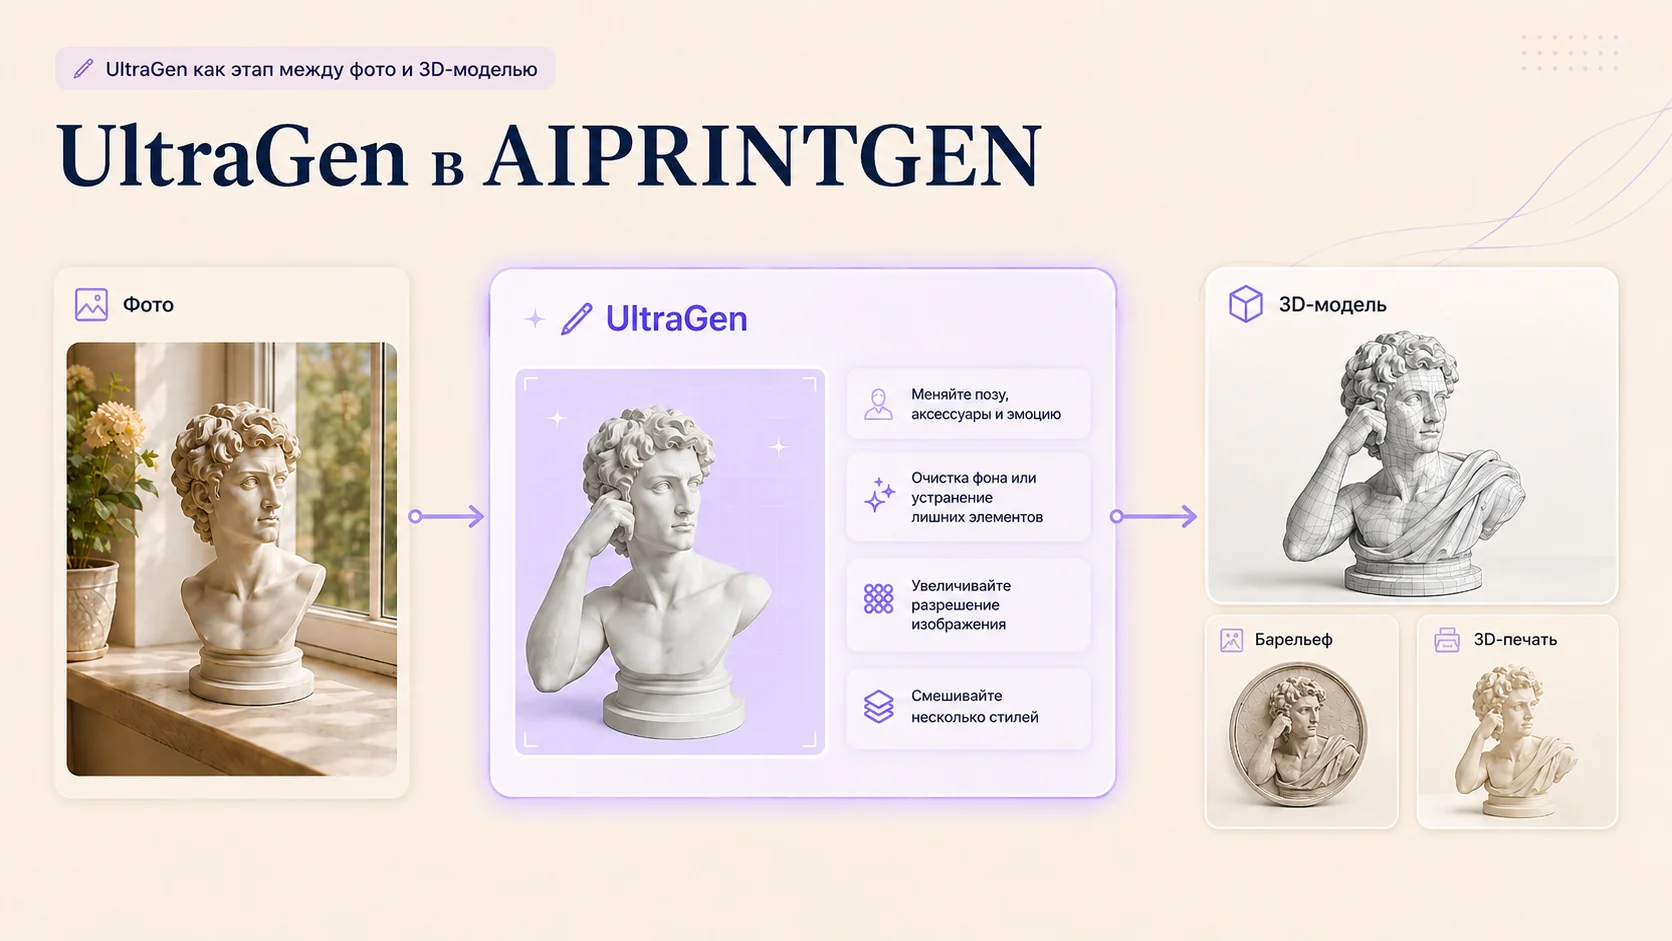
If the original photo, drawing or logo needs work, first prepare a cleaner and more informative 2D reference in the UltraGen tab.
The workflow. Source image → processing in UltraGen → a new 2D reference → generating the STL model. More on what the tool can do in the article "UltraGen in AIPRINTGEN: how one tab helps prepare your image".
How to create a 3D model from a photo in AIPRINTGEN
1. Prepare the image
Before uploading, it is worth doing the following:
- crop away the excess margins;
- remove stray people and objects;
- check that no important details are cropped;
- separate the silhouette from the background where possible;
- make sure the image is not blurred;
- choose an angle where the volume reads well.
There is no need to remove every natural shadow: they help the form be perceived. What matters is only that a shadow does not change the silhouette or merge with the object.
2. Upload the photograph
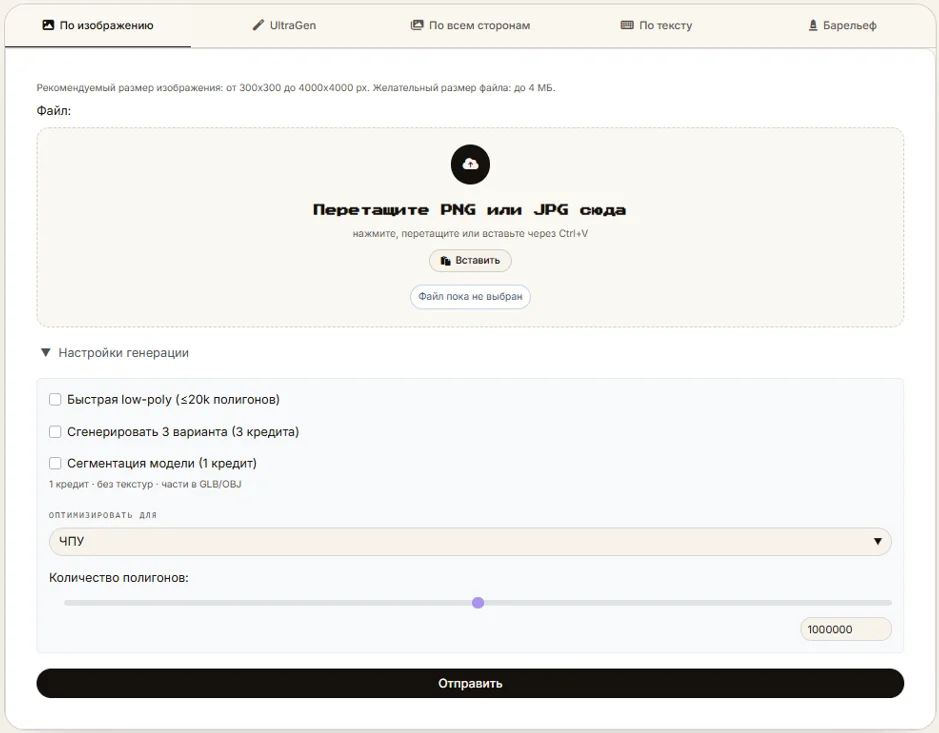
Open the "From image" tab in the AIPRINTGEN generator and upload the prepared file. If you do not have a suitable image yet, you can first create or edit one in the UltraGen tab and then use it as a reference for the 3D generation.
3. Specify what the model is for
In the "Optimise for" field, choose "3D printing". The purpose helps the system take the intended use into account. A model for printing especially needs readable geometry, sufficient thickness in its features, no stray internal surfaces and stability once scaled.
4. Choose the generation settings
The interface offers the following options:
- detailed textures — useful for digital viewing and as a guide when painting;
- fast low-poly mode — models up to 20 thousand polygons, optimised for game development and XR;
- three variants — handy for comparing different interpretations of the form;
- model segmentation — particularly useful if you go on to build articulated figures with Riggable;
- a polygon-count cap — the balance between detail and file size.
A miniature with a face, fur, folds and ornaments usually needs higher detail. For a tabletop-game miniature around 3 cm tall, up to 500 thousand polygons is often enough as a detail setting, but printability depends more on minimum feature size and printer resolution than on polygon count alone.
5. Run the generation and inspect the result
Once the model is created, do not stop at the front view. Rotate the object and check:
- the face, the back of the head and the hair;
- the back and the underside of the model;
- hands, fingers, feet and thin protruding details;
- where accessories meet the body;
- symmetry and proportions;
- the stability of the pose and the contact area with the base;
- any accidental merges and internal elements.
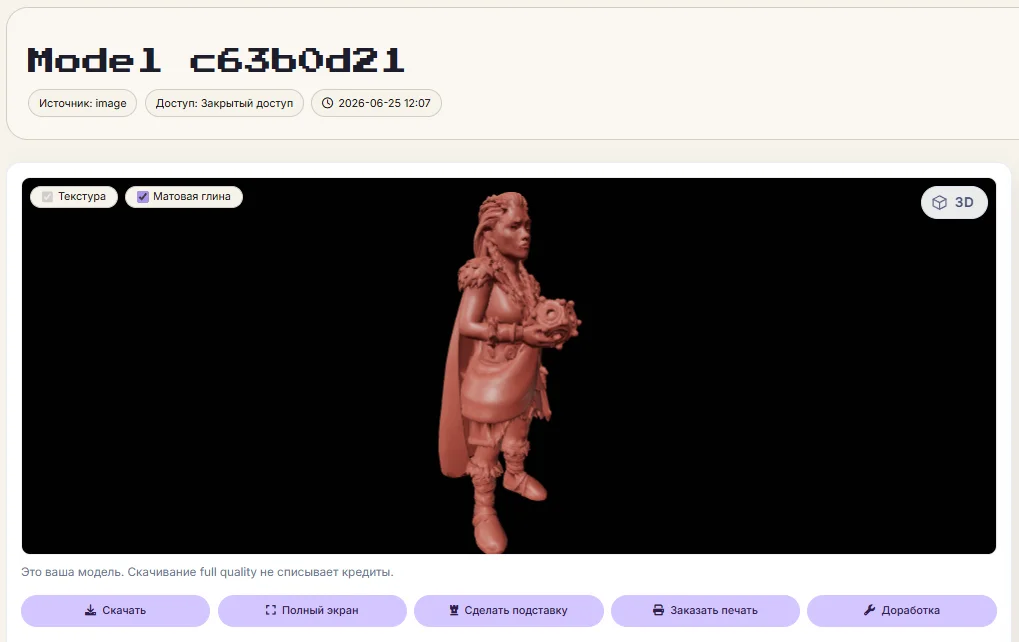
Results are saved in the "My models" section, where you can view them in the built-in 3D viewer with and without texture.
6. Download the right format
| Format | What it is usually used for |
|---|---|
| STL | Preparing the geometry for 3D printing in a slicer. |
| OBJ | 3D printing and further geometry editing; can carry separate materials and textures. |
| GLB | Viewing a coloured model in the browser, AR, digital presentations and passing textures along. |
| FBX | Animation, game engines and professional 3D pipelines. |
For ordinary 3D printing, STL or OBJ are the usual choice. GLB and FBX are handier when textures, animation or a digital demonstration of the model matter.
7. Check the model in a slicer
The neural network reconstructs the form, but the parameters of the actual print depend on the printer, the material and the scale. Before you start, check:
- the physical dimensions of the model along X, Y and Z;
- the thickness of fingers, weapons, hair, horns and other thin details;
- the orientation on the build plate and whether supports are needed;
- stability and the contact area with the platform;
- surface integrity and the absence of errors flagged by the slicer;
- clearances and fits, if the model consists of several parts.
A detail that looks fine on screen may turn out too thin once the model is scaled down. Conversely, a slight thickening or a change of orientation often makes the print far more reliable.
Which models usually come out most predictably
Generation from a photo works best when the object has:
- a solid, clearly distinguishable silhouette;
- noticeable volume and understandable symmetry;
- a moderate number of separate elements;
- a calm background and even lighting;
- a pose without complex overlaps.
Good subjects for your first experiments:
- stylised characters;
- animals;
- mascots and simple figurines;
- portrait busts;
- statuettes and decorative objects;
- tabletop-game miniatures.
Complex objects more often need several generations or manual reworking.
How to improve the accuracy of the hidden sides
If the look of the back, the back of the head or the sides really matters, one photograph may not be enough. AIPRINTGEN supports a four-sided mode: front, left, back and right. The shots should show the same object at a similar scale, in similar lighting and in the same position.
- do not change clothing, accessories or pose between shots;
- keep roughly the same distance to the camera;
- avoid widely differing lighting;
- make sure the object is not cropped;
- use a neutral background where possible.
Several views do not guarantee engineering accuracy, but they considerably reduce the uncertainty when the form is reconstructed.
How to improve the result if the first generation missed
An unsuccessful first attempt does not always mean the object has to be modelled by hand. Often it is enough to improve the source step by step and generate again.
- Try another angle. Three-quarter conveys volume better, the front view conveys symmetry, and several sides cover the hidden parts.
- Make the limbs readable. Prepare a reference where the arms and legs do not overlap one another.
- Enlarge the important details. An accessory that should become physical relief has to be visible in the source.
- Create several variants. Compare the geometry from every side and pick the best interpretation.
- Prepare a new reference in UltraGen. Sometimes it is easier to fix the pose, background and composition in 2D first, then repeat the image-to-3D step.
What you can do with the model after generation
Once you have the result, the model can be:
- prepared for FDM or resin printing;
- edited in Blender, ZBrush or another 3D editor;
- split into parts using segmentation;
- given a base, or have its existing base changed;
- used with its texture as a guide for painting;
- prepared for animation or a digital presentation;
- turned into an articulated figure.
Articulated figures with Riggable
Riggable helps split an STL or OBJ model into parts, add joints or hinges, and then export the pieces for printing and assembly.
Before printing, check the cut locations, the size of the connections and the range of movement.

Articulated figures. More on what the tool can do in the article "How to turn a 3D model into an articulated figure for 3D printing".
In summary
Generating a 3D model from a photo is one of the most accessible ways to get from an image to a physical object. You do not have to build geometry from scratch: prepare a clear reference, choose the purpose and the generation settings, then assess the result from every side.
If the reverse side matters, use several consistent angles. If the source does not work in terms of pose or composition, prepare a new 2D reference in UltraGen.
When a project does not need a full volumetric model, a photo, drawing or logo can be turned straight into a bas-relief on a flat base. For an articulated figure, the finished geometry can additionally be split into parts and fitted with connections in Riggable.
Before printing, run a final check in your slicer.
Next, follow the guide to creating your own figurine and check whether the model is suitable for 3D printing. Start another photo-to-3D generation, continue in AIPRINTGEN, or review current plans and pricing.
Create a 3D model from a photo
Frequently asked questions
Why is AIPRINTGEN suited to creating models for 3D printing?
In the service settings you can choose optimisation for 3D printing, control the level of detail, create variants and segment the model.
Can I create a 3D model from a single photograph?
Yes. The neural network fills in the areas it cannot see; for a more predictable shape, use four consistent views.
Can I make an STL file from a photo?
Yes. In AIPRINTGEN you can upload an image, generate a volumetric model and download the result as STL. OBJ, GLB and FBX are available too.
What kind of photo works best for generation?
A sharp photograph with the whole object in frame, a readable silhouette and minimal overlaps.
Will the resulting model be suitable for 3D printing?
Yes, but set the scale and check the model in a slicer before printing.
Do I need a texture for 3D printing?
For ordinary single-colour FDM or resin printing, the geometry is what counts. A texture is useful as a colour reference, for digital visualisation or for painting afterwards. A painted-on pattern will not become physical relief if it is not in the mesh.
What if the neural network got the back of the model wrong?
Upload several consistent views or prepare a more informative reference in UltraGen.
Can I create a bas-relief from a photo or a logo?
Yes. AIPRINTGEN has a separate bas-relief generator for photos, drawings and logos. It creates a relief model on a flat base and lets you download the result as STL for printing, CNC or mould making.
Do I need to know how to use Blender?
Manual 3D-modelling skills are not required to run a generation. Blender or another editor comes in if the model needs substantial changes, has to be combined with other objects or adapted to specific production requirements.
Other AIPRINTGEN tools
There are separate guides for the neighbouring 3D-printing scenarios in the ecosystem:

How to Prepare a Bas-Relief STL from a Photo for CNC →
 Our community


